


Lighting design for motion picture can
be controlled by controlling just five factors.
They
are
(1)
Direction/Angle/Position
from where light is coming
(2)
Intensity/Brightness of
light
(3)
Color – is the light
White, blue or yellowish?
(4)
Quality of the shadow –
hard, cut out or soft, fuzzy?
(5)
Texture of light – is
it continuous, drab or patchy?
Below
are given some representations of each.


Light coming from different
directions


Light coming from the same Direction
But of different Color


Light on the character’s face changes in Intensity. Notice
that the Background light is unchanged


Light coming from the same direction and of the same
intensity. But it creates Hard and Soft shadows. Light glitters differently on
the Appy bottle, giving it a different look. That is part of the light’s
texture.
Out of these five
factors, the texture of the light is the most difficult to describe in words,
and even the most difficult to visualize. This is why text books on lighting
avoid this.
Direction/Angle/Position of light

The whole structure
looks like half a wall clock. The five light positions are the basic positions
around the face.
First time
photographers, almost always, place the light next to the camera.
If a single light is
available, that common sense choice is actually the ultimate wrong choice.
Light travels in
straight line. And lighting design is for producing pleasant contrast between
the grounds (Fore, Middle and the Backgrounds) for the story.
To produce contrast,
separate lights are needed for separate grounds.
When light is next to
camera, at 6:00 position of the clock, no contrast can be produced. The same
light would fall on both the human face and the background.

Gerald Millerson, in Lighting for Television & Film, has
described this in great detail.
At 7:30 position of the
light, the face would get a pleasant modelling. On the frame left, the human
face would be lit up.
On the dark side of the face, there would be a patch of
light, Depending on the height of the light, that patch would be above or under
the eye.

When light comes from
the left side of the frame, and such a patch is created under the eye, on the
dark side of the face, it is known as Rembrandt light.
The 17th Century Dutch
painter Rembrandt created such light patches in darkness to build up a
Classical style of human portrait.

When in confusion, it
is wise to set the character light to 7:30 position (or its opposite 4:30).
This direction of lighting seems to be natural for almost all types of moods.
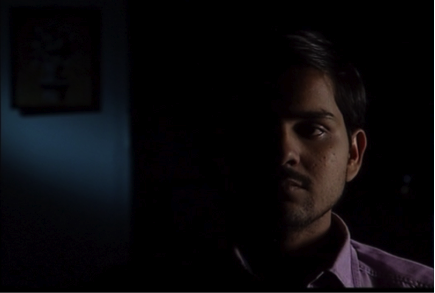
The next basic position
of the light is 9:00. When light comes from that direction, it divides the face
into lit up and fully dark.

A character in
confusion, indecision or dilemma may be lit up like this.
So may be a character
caught up between good and evil, or life and death.
Light position from
6:00 to 9:00, which are near camera positions, are known as the downstage
positions. Specifically 7:30 – 6:00 – 4:30 are known as the downstage ranges.

On the other hand,
upstage lighting creates a lot of contrast. Hence, for very typical night
scenes, or very dark mood, upstage lighting is preferred.
When light comes from
10:30 position, it automatically looks like night. Many people see the white
light as blue, when light comes from this direction. That is an illusion. But,
that happens.

This position of light is known as Kicker. When the Kicker is more like a rim, specially on
long lean faces, it is known like a Rimlight.
Going more upstage, from 10:30 to 11:00, or 11:30,
makes the Kicker more Rimlight for the same face.
When the light is directly behind the character’s face,
the character hides the light from the camera. This happens at 12:00 position.

The character is presented as an outline in the
darkness, for this light position.
If the light is taken to a height above the character’s
head, it produces a halo around the face.

This light is known as backlight, to painters and photographers.
D W Griffith’s Cameraman Billy Bitzer started using
this light for Lilian Gish.
Slowly everyone took to this light, for giving a
glamor look to the hero, or heroine. At the same time, this helped in
separating the character from the background.
Things are pretty same on the other side of the clock.
7:30’s opposite look is produced by 4:30. Similarly, 3:00 divides the face into
halves just like 9:00; and 1:30 produces a Kicker
effect like 10:30.
Position of the light is the most important memory for
a photographer. It is easy to identify the position of the character light in
any other photographer’s, or painter’s, work.
Once a photographer
knows the emotion or mood produced by a certain light position, s/he can make a
note of it. Such notes or diagrams come very handy in reproducing any light
situation very quickly, and precisely.
A Director of
Photography may create such lighting diagrams scene by scene. S/he then hands
them over to the gaffer and the assistant.
They can light up
perfectly using the diagrams as a kind of notation, in the DP’s absence.
That makes work easy
and much quicker.

Half light modified. Note both the eyes are visible.
(To be
Continued)
